Showing posts with label infection. Show all posts

Sunday, 2 February 2014

Implants part 2. Prepare yourselves....

Part 2 Implant overview.

Hope you made it through the last without falling asleep/questioning why the hell you would read such a thing. This week’s post is going to detail a little more about the procedure of placing implants, long term care and general post implant placement information.

How long does the whole process take/what do I have to go through.

When answering this question there are various things to be considered, the main being whether or not the implants are placed and restored (i.e. placing of the crown or bridge or denture on top of the implant) in stages vs in one go.
I’m sure you will have all come across those adverts in the newspaper/the back of certain magazines that offer the operation to place the implant and then restoration of the implant in a day.
This is incredibly misleading, as it is virtually impossible to make a denture, crown or bridge to fit on an implant within a day, unless you have some sort of miracle lab and even then various impressions (moulds) need to be taken of your implants in order to get the best fit and appearance. If the dentist is just relying on one impression taken straight after the implants are placed when there is bleeding, swelling etc then it is highly unlikely that the crown/bridge/denture is going to fit, look good and work well. Thus if you went to a decent cowboy dentist they would require at least a couple of visits.
Now this only takes into consideration how it is going to look immediately. There is some debate within the implant community (a bunch of very cool people) about the length of time and number of stages that should occur for the best result.

ADI summarise this nicely.

“For routine cases, from the time of implant placement to the time of placing the first teeth, treatment times can vary between 6 weeks and 6 months. The availability of better bone can be used to decrease treatment time, whilst more time and care must be taken with poorer bone, which can therefore extend treatment times beyond six months”
They would class routine cases as simple tooth loss situations i.e. not following cancer treatment or illness, in patients with suitable bone.
When assessing all patients who are considering implants there is a basic structure of appointments etc that should be followed if you want to get the best out of the implants and not destroy your mouth.

Handy subtitle time…

Summary of stages for routine dental implants

Stage
Eh?
Other info – if you’re still with me
Diagnosis
Your current dentist may be the one who is offering to provide implants, in which case, they should be familiar with your mouth and hopefully should have been responsible for doing the groundwork for the time that you have been seeing them i.e. any fillings, treating gum disease etc. However different dentists will of course have different opinions and so if you are going to see an “implant specialist” in another practice, they may request that your own dentist carries out any dental repairs, filling replacements or extra courses of gum treatment. Hopefully they wont be pointing out anything too new and if they do i.e. “good GOD has a bomb gone off in your mouth”/ “you have RAGING gum disease” then you should perhaps consider finding a new general dentist.


Treatment planning
Treatment planning involves determination of where the implants are going to go. Certain things have to be considered at this point:
a.    Whether there is enough bone to support an implant
b.    Whether there is enough room to place an implant and its restoration (e.g. bridge, crown, denture)
c.    Whether placing an implant is going to affect any important things in the mouth i.e. the sinuses/nerves. See some pictures below for this.
a + b
The amount of bone and the amount of space have to be considered in various different dimensions. There are also different considerations for each area of the mouth due to the force that teeth take depending on their position in the jaw. The best way to explain this is with pictures. See below.


 1)    Vertical dimension: think of it as height of bone/space between the teeth or space between the jaws


Now the above situation is only for front teeth which generally take a lot less force. Yes you use your natural teeth to bite into apples etc which technically you can do with implants but with the amount they cost per piece you’ll probably want to be cutting your apples up into pieces from now on.

So, for crowns towards the back of the mouth we need more space because the restorations have to be much stronger as the back teeth take significant grinding forces. For this reason we need at least 3-4mm space between the implant abutment and the opposing teeth.

In the picture below you can see that the space between the abutment on the implant and the top teeth is only just 4 mm. In this case this simply is not enough to make a decent white crown. The reason for this is that the white bit of the crown – the ceramic – has to be a certain thickness to a) look good and b) be strong enough. At less than an ideal than an ideal thickness will look like a grey blob and/or break and fracture as soon as you try and eat something. So for the picture below, the only option would be to place a full metal crown which can be made much thinner due to the increased strength of metal over porcelain.


The final set of considerations in terms of measurements is for dentures.  There should be 10–12 mm of vertical space between the implants placed in either the top or bottom jaw (or in fact both) in order to place good sized teeth  

If a bar is used for the denture to clip onto – as opposed to simply clipping into the top of the abutments, then this measurement must allow for a space of 2mm between the gums and the bar so that it can be effectively cleaned under.


The next measurement to consider is width of the bone, i.e. between the cheeks/lips and the tongue/palate. Obviously these measurements all depend on the size of implants the specialist is intending to use. 3.25 mm diameter implants are the smallest available, according to dentalcare.com, 6mm width of bone is the minimal thickness into which 3.25 and 4 mm diameter implants can be placed.  Larger diameter implants (5 and 6 mm) require at least 7-8mm. Although these measurements are large enough to accommodate an implant, it means that the implant can only be placed in one direction as there is limited bone either side of the implant. .


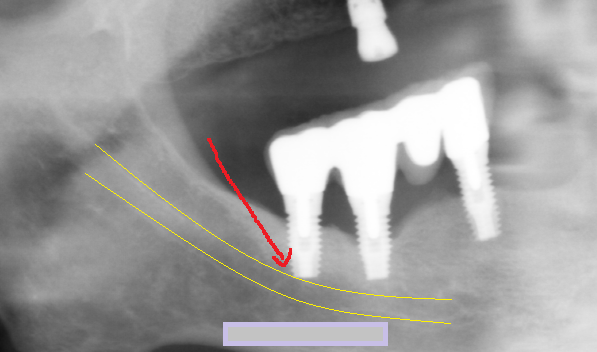
So, miles back, I also mentioned the importance of checking for vital structures.

1)    The sinuses.
These are the bits in your face that get really painful when you have a cold.


2)    Nerves
 

 Once all the above nonsense has been assessed, and any bone grafts or sinus lifts have been performed (which the specialist can explain in far greater detail using your own xrays/scans and fun models etc) then we can get down to the good stuff and actually put the damn implants in.

Stage
Eh?
Other info – if you’re still with me
Implant Placement
Drilling the implant into the bone and the gum

There are 2 different schools of thought as to how exactly this should go. Of course, the screw part of the implant goes into the bone, but there is some debate as to whether this screw should then be covered back over and allowed to heal completely hidden below the gum, OR whether an extra bit (an abutment) should be placed on top which pokes through into the mouth, and allow the gum to heal around this.

Time for some more pictures
Implant placement is usually followed by a period of healing lasting from 6 weeks to 6 months.
Stitches are normally removed 7 to 10 days after the implant placement.


 Generally, the process goes a little like this.

1)    Tooth extracted

a.    At this point if you had/have a whopping infection like an abscess then the area will be allowed to heal for a while as placing an implant into infection is like building a house in sand (and we all know how that song goes)
b.    After this healing, a space for the implant to go in will need to be made, unlike if the tooth is just removed and there is a nice space there from where the tooth was sitting
c.    If the tooth is just being taken out because of trauma/decay/gum disease then an implant can be placed into the socket straight away

2)    A hole for the implant to sit in is made in the bone. Generally there is already a “hole” from where the tooth was removed but this isn’t a standardised shape and so the area is shaped to fit the implant perfectly. 


 3)   It is at this point that the debate starts.

a.    Sometimes the implant screw is placed and then covered over and the gum is “sealed” with stitches
b.    Other times a “healing abutment” is placed on top of the screw which pokes through the gum. It looks like a small silver button on the gum in the mouth – lots of fun to scare children with.
                                          i.    After either a or b there is a period of osseointegration a.k.a integration of the implant with the bone of the jaw before any sort of crown, bridge or denture is placed on them. This allows for the implant to become more “part” of the jaw than a false object before you start expecting it to carry the weight of biting force.
                                         ii.    This process of osseointegration takes between 3 and 6 months depending what you read.
                                        iii.    During this time you will of course have a space where the tooth was. If you had coped fine with this space before seeking an implant then you can carry on with a space, however if you have had the tooth taken out or it has been knocked out in fact then you may not fancy walking around with a gap. The only realistic option is a temporary denture which will replace this missing tooth. Sadly it is a reality that if there is any period of time of healing then you will need a temporary option to fill the space and you just have to accept this I’m afraid.
c.    The implant, abutment and temporary version of whatever the final restoration is planned to be is placed straight away. The temporary version is not in the bite, i.e. there is a gap between the teeth so that biting forces are not applied to the implant while it heals. This of course means that you have a nicer option than a temporary standard denture but it will not be the final object and you will have to go back in a few months to have this done.
d.    Of course the above point is irrelevant if the decision is made to place the implant, abutment and final restoration i.e. crown/bridge/denture immediately. Of course this sounds like the ideal option. Minimal time spent, it’s what they use on those 10 years younger programmes so it must be good etc however it does not allow any time for this “osseointegration” before you are expecting a false titanium screw to stand up to the forces you apply when chewing through an overcooked steak. Imagine trying to walk on a hip replacement within hours of it being placed. You just wouldn’t and the same usually applies with dental implants but as with everything there are differing schools of thought.


Why you SHOULD wait?
Why you SHOULDN’T.
A study by Adell et al. 1981 conclude that loading i.e. allowing the implant to take biting forces straight away after placement can interfere with healing. Ideally, we want bone to form all the way around the implant so that it becomes almost part of the jaw. If biting forces are applied to the implant too soon, the implant moves within the jaw (only minimal amounts like vibrations) meaning that instead of bone forming around the implant, soft squishy stuff forms instead –like when you pick off a scab too early and this inevitably will lead the implant to fail.
Studies have found that immediate implant loading achieved similar success rates as those reported in the delayed 2-stage approach therefore, who cares about all the theory.

Covering over the most important bit of the dental implant – the actual implant bit, allows for safe healing and protection of it from all the bacteria in the saliva.
If the implants are to be placed in the lower jaw, then there is more chance of success with immediate placing of the final crown/bridge/denture

Some research suggests that GENTLE loading of the implant right after placement actually helps the strength of bone healing around the implant, a bit like gentle exercise after any operation will help with healing.

Stage
Eh?
Other info – if you’re still with me
Healing
As mentioned above, this takes around 3-6 months
During this time you will probably be going backwards and forwards to see whoever placed the implant(s) to  check healing, check how the gum is forming around the implant and to make any adjustments to temporary dentures etc
Restoration
This is the placing of the final crown, bridge or denture on top of the implant.

Looking after the damn things
It is important to again reiterate that dental implants are not natural teeth. They don’t act in the same way, they don’t fail in the same way. It is also worth noting that when an implant fails, it is really bad. If a tooth breaks or has to be taken out, then usually its just the tooth that’s the problem.
According to Carl Misch, DDS, MDS (lots of letters after his name so he must be important) “when the implant fails, it also destroys the bone around the implant” often to the point where the whole plate of bone in front of the implant (the bit that you can feel under you gum) is completely lost
Similarly,  “if that implant happens to have been placed on a bone graft, this means that this particular implant failure could result in insufficient bone to re-implant” i.e. there’s sod all that can be done if it fails.
It is worth mentioning at this point that dental implants don’t last forever. They have a life span just as hip replacements, boob jobs etc do. If you look after them well i.e. keep them clean, have regularly checks with your dentist and hygienist visits, don’t smoke, have ideal medical fitness then you could be looking at 20 years. HOWEVER during this time you will likely have to have the crown/bridge/denture on top of the implant modified as they will get worn or damaged by eating and so on.
.


 So, in summary,
1)    Don’t smoke
2)    If you have gum disease, don’t even think about asking for an implant
3)    If you want a quick fix, implants are not for you. Similarly if the thought of having a scalpel/bone drill coming at you makes you feel sick/dizzy then implants are not for you
4)    If the thought of having a denture puts the fear into you, then again, implants are not for you. In 99% of cases you wear a short term denture while the area of infection after taking the tooth out heals, or while the implant heals
5)    If you have no bone, you can’t have an implant unless you are suitable for bone grafting which takes time, effort, money and could potentially also fail.
6)     Go and see a specialist who knows what they're doing and can fix problems if/when they arise

I realise this was probably very hard going on the reading front, and admittedly it was probably written more for my benefit of learning through researching but maybe it will help someone!

As always, if you have any questions please feel free to ask. Finally, apologies for the varying fonts used on the pictures, I think I may have been losing the plot as I neared the end. 


Stuff I looked at
Gapski R, Wang H-L, Mascarenhas P, Lang NP. Critical review of immediate implant loading.  Clin. Oral Impl. Res, 14, 2003; 515–527
Adell, R., Lekholm, U., Rockler, B. & Bra˚nemark, P.I. (1981) A 15-year study of osseointegrated implants in the treatment of the edentulous jaw. International Journal of Oral Surgery 10: 387–416
Bra˚nemark, P.I., Adell, R., Breine, U., Hansson, B.O., Lindstrom, J. & Ohlsson, A     1969 Intra osseous anchorage of dental prosthesis I: Experimental studies Scandinavian Journal of Plasticand Reconstructive Surgery 3: 81–100.

http://www.drchetan.com/dentalpics/plog-content/images/dental-instruments/dental-implants/dental-implant-14.jpg

Sunday, 3 November 2013

Wisdom twooth

Hello all.

If you have returned for the second instalment of my wisdom tooth rant then I thank you! I realise the last one was a bit of a slog but hopefully it provided some basic information about the problems wisdom teeth cause.

I discussed pericoronitis last time, which is the most common problem wisdom teeth cause. I also briefly mentioned that if you rocked up to your dentist, or worse, the dental hospital, demanding extraction (whipping out) of your wisdom teeth because they don’t look very nice, they are the cause of all your life problems (failure of your marriage, loss of job etc) then sadly you will be met by a wall of silence and handed a “bye bye” discharge letter.

Unfortunately, as with most things, there are risks to taking out all teeth. Wisdom teeth are particularly troublesome (to put it mildly, I would quite frankly say they are a pain in the arse) to take out.  This is mostly because of the position right at the back of the mouth, or as mentioned before that they are literally wedged in place often below the gum line. They are also a bit of an anomaly. Whilst most teeth have a generally accepted anatomy, wisdom teeth are a law unto themselves, a bit like Miley Cyrus or Lady Gaga – you never know what you’re going to get from one day to the next. They can have 1-3 roots of different angles, either splayed out or fused together. They can be surrounded by bone, or even be fused to the jaw bone. Therefore, if we can avoid taking them out – much as we enjoy getting out our pneumatic drills and nail guns – if you don’t absolutely need them removing, you don’t get them extracted. Especially not by me.

The most important reason for why we are hesitant about taking wisdom teeth out however is due to unavoidable potential side effects, the most important being nerve damage.

In order to explain this I am sadly going to have to describe the process of extracting wisdom teeth in some detail. If you are at all squeamish, you may wish to skim over this bit.

Of course, if you have a fully erupted wisdom tooth, i.e. it is fully visible in the mouth just like all the other (normal, non-pain-in-the-arse-causing) teeth, then the procedure for taking it out is no different to other teeth.
However when the tooth is partially erupted, or unerupted, it is surrounded by bone and there is very little/no tooth to grab hold of with our highly advanced sci-fi (not) forceps. In this case we have to do something called “minor oral surgery”. As opposed to major oral surgery which I imagine entails something similar to beheading and fortunately not performed by any of us toothworkers. Well, not intentionally anyway.

Minor oral surgery for wisdom teeth
As the wisdom tooth is surrounded by bone, in order to take it out, we have to remove some of this bone, and the only way to do this is peel back (sorry, I desperately consulted several thesauruses for a better way of phrasing this but this genuinely is the best way of describing what we do) the gum and then drill away some of the bone in the same way that we drill to do a filling.

Before you go into panic mode, the important thing to remember is that the only difference between a “normal” extraction and this method is that we directly visualise the roots of the teeth that we are trying to take out. In some ways this is actually easier and often means that less “force” is required to take the teeth out as we can get a better leverage and see exactly what we are working with – i.e. 3 roots, 2 roots, fused roots etc.
The same amount of anaesthetic (if not slightly more because we often book longer for this minor oral surgery appointments than we do for regular extractions) is used, and the only difference you will actually be aware of is the noise/vibration that occurs when removing bone, and the fact that you will have some stitches in place afterwards.
So here goes.

How to (surgically) take out a wisdom tooth for dummies.
1)    2 or 3 cuts are made in the gum. Again, please remember you will be completely numb for this, so you will feel that we are there/pressure but not pain.

2)    The wisdom tooth will then be hidden behind a layer of bone.
Sadly, Google seems to want to terrify people into never attending a dentist ever again and thus most pictures I could locate were not appropriate for this blog, unless I want to do myself out of employment of course.


 It is at this point that I suppose the most “risky” aspect of the extraction arises.


This nerve supplies sensation i.e. feeling for HALF the lower lip (the half being whichever side the tooth you are talking about is, i.e. right tooth, right half of lip), some of the skin of the cheek, and half of the lower teeth. It is important to mention that it does not provide motor or movement supply to these areas.
When extracting LOWER wisdom teeth damage can occur to this nerve. The wisdom tooth can be sitting on the nerve and when it gets wiggled out this can irritate the nerve. The roots can be wrapped around the nerve and on taking it out more damage can occur. Sometimes the tooth itself is not actually touching the nerve but in order to extract the tooth, bone has to be removed and this can cause damage to the nerve. See below. #freeadvertisingforthisguy


This means that following the extraction it will feel like you are still numb. Like when you have an injection before a filling for a lower tooth, that sensation will continue past the time when the anaesthetic wears off. There are various figures in the literature about 1) the chances of this damage happening and 2) whether or not the sensation comes back.  They estimate that there is around a 2% risk of damage occurring to this nerve during lower wisdom tooth extraction. Of course if you need an upper tooth out, this risk is irrelevant. In terms of whether this sensation will return, there is again debatable evidence. It is most common that the disturbance to feeling is temporary i.e. it will return, usually fully, however it is estimated that 0.6 to 2.2 percent of cases of people who lose sensation after wisdom tooth extraction will have this permanently.
What this means in terms of your daily life is that nothing will be visibly different either whilst your face is still, or if your face is moving. Your lip etc will move normally, it will just feel different i.e. numb or have a pins and needles sensation. It is however important to point out that there is a small chance that by leaving infection or pathologies (e.g. cysts) around wisdom teeth, the same nerve damage can occur but is much less predictable so it really is best to get them out in this case.  

Whilst we will always take an xray of the tooth to be extracted, and have a good idea of where the nerve is positioned, radiographs (x ray images) are only a 2D image of a 3D situation so the only really guaranteed information they can give us is “yes the tooth is close to the nerve” or “no the tooth is miles away”. Luckily some Hungarian oral surgeons have completed a study and summarise this nicely “radiography [i.e. taking and interpretation of x ray pictures] is an inadequate screening method for predicting IAN [inferior alveolar nerve] paraesthesia after mandibular [i.e. lower] third molar removal


Back to the surgical bit….


3)    Following bone removal so that we can see the tooth,  it is then extracted. This is done in a number of ways but for the purposes of how much you need to know and what you will be aware of, at this point you will feel pressure and lots of wiggling of equipment from our part.
4)    Once the tooth is out, we will then replace the flap back over the area and place a couple of stiches to hold it in place. These will dissolve by themselves but you will of course be aware of them.

As with any extraction, you will be sore afterwards. As you can see, the procedure is slightly more involved than the normal, grab-it-pull-it-out technique that we can use on other teeth, so expect to feel a bit naf for a few days. Your dentist will give you lots of aftercare instructions and things to expect straight after you have gone through this and thus you won’t listen to a word so I will summarise.


1)    Pain, swelling.  I have lumped these 2 together because it is pretty much guaranteed that you will experience these. In terms of pain, the best medication to take is paracetamol and ibuprofen. You do not require codeine or in fact as I have been asked for on several occasions – ketamine. Please check that you are ok to take ibuprofen. It is one of a group of drugs called NSAID’s and can cause problems for certain asthma sufferers, people with kidney disease, stomach problems etc. Also, if you are already taking an anti-inflammatory medication e.g. for arthritis, back pain, then do not increase your dose.
Swelling will reach a maximum after 48 hours then begin to go down. You may also notice some bruising if it is a particularly difficult extraction. Expect the worse basically, then you will be pleasantly surprised.
2)    Bleeding. This is where people get confused. If you have the tooth “surgically” removed, the wound will be stitched. This can help reduce but not eliminate bleeding. If you do not have stitches, there will be some oozing of the area. The small amount of blood coming from the socket where the tooth was taken from, mixes with saliva and causes people to panic that they are bleeding out and have seconds to left to live without a transfusion.
We will usually give you some squares of gauze to take home with you. If you feel that the area is actually bleeding, i.e. when you spit out, it is red not just pink, then roll one of these gauze pieces up into a sausage and bite for 20 mins. If bleeding continues you need to return to your own dentist or go to A+E.
3)    Infection. When you cut yourself elsewhere on the body, in order for it to heal you want a scab to form. In the mouth it is a similar concept but you want a blood clot rather than a scab. If you do a gym session, lift heavy objects, raise your blood pressure in any number of ways, this will dislodge the clot and leave a gunky mess in the socket. Gunky mess = no healing. Similarly, if you decide to leave the dental surgery and have a fag, the same thing will occur. You will then come back crying to us in more pain than you were with the toothache, with something called “dry socket”.
Heat will also increase blood pressure, so don’t hold anything hot against the side of the face to try and ease discomfort because it will just make it worse in the long run.


If this does occur, go back to the dentist and we will place a dressing in. This works wonders but it tastes repulsive so let that be a warning to you.

4)    In terms of keeping the area clean, brush the other teeth as normal. SPIT DON’T RINSE FOR 24 HOURS. As above, if you rinse and swill around the mouth vigorously, you will dislodge the blood clot and end up in the above situation. For 24 hours just spit out any blood stained saliva you feel is building up. After 24 hours, start with some hot salt water mouthwashes. Get some hot water, fill a mug or a cup, add a teaspoon of salt, GENTLY swish this around your mouth and spit out until the cup of water is gone. If you don’t do this, you will get nice bits of your roast dinner, cereal etc building up in the socket which then I have to fish out. Usually before lunch. Please save me having to do this.
5)    If you have any concerns, please just ring your dentist. They can advise you, settle worries, and recommend you come in for a check if necessary.

Finally, just when you are wondering why the hell anyone would choose to do this to themselves, there are a number of myths surrounding extraction of wisdom teeth and why/when we take them out. For this I require the assistance of the wonderful people at the National Institute for Clinical Excellent (NICE) who provide helpful although thoroughly not-NICE guidance on a number of clinical topics.

Because of the aforementioned risks of taking wisdom teeth out – pain, bleeding, swelling, infection, nerve damage etc – we will try not to do it if we can. NICE in fact says that there is no reliable research to suggest that impacted wisdom teeth free from disease should be operated on.
They classify “disease” as decay which cannot be fixed by filling or root canal treatment, either because it has gone too far or because the tooth is at such an angle that we simply cannot treat it. Similarly, if it is causing damage to next door teeth, this is a valid reason for removal. Wisdom teeth are also deemed to be valid for “the bucket” if they are in the path of a cysts, tumour, or cancer which needs removal.
In terms of the aforementioned pericoronitis, NICE basically suggest it is a bit of an opinion based deicision. They state that “plaque formation is a risk factor but is not in itself an indication for surgery…The evidence suggests that a first episode of pericoronitis, unless particularly severe, should not be considered an indication for surgery. Second or subsequent episodes should be considered the appropriate indication for surgery”. I.e. unless you have been back to the dentist several times with this problem, and we can see that you have been trying to resolve the situation yourself by keeping it clean, you will not qualify to have the tooth taken out.

To finish, the common myth that eruption of wisdom teeth causes crowding of the other teeth. I was going to paraphrase this paragraph from oralhealthgroup.com but it just summaries the absolute ludicrousy that this concept presents.
“It is not possible for lower third molars, which develop in the…interior bone…with no firm support, to push 14 other teeth with roots implanted vertically like the pegs of a picket fence so that the incisors in the middle twist and overlap. Third molars do not possess sufficient force to move other teeth. They cannot cause crowding and overlapping of the incisors, and any such association is not causation.

This is also supported by a number of studies of high evidence level (i.e. they were conducted by the highest level of boffin). I have included some of these below with boffin-normal person translations:

1)    No statistically significant third molar presence-specific differences were recorded in the lower dental arch crowding between the groups with erupted and unerupted third molars. i.e. people with crowding were examined and among these people it was noted whether or not they had wisdom teeth present. The study found that the crowding was completely unrelated to the presence of 3rd molars.

2)    The principal conclusion drawn from this randomized prospective study is that the removal of third molars to reduce or prevent late incisor crowding cannot be justified. Now us tooth workers love nothing more than whipping out teeth so this is a fairly significant finding. 

3)    The dental arches in the extraction group tended to be more crowded than in the group with complete dentitions. i.e. this study found that in cases where wisdom teeth had been extracted there was in fact MORE crowding. This is most likely a coincidence but just goes to show the lack of importance of wisdom teeth on crowding.

4)    This study has not been able to predict which patients should react favourably or unfavourably to removal of the third lower molars in cases of anticipated crowding. I.e. these guys haven’t got a clue.


In summary, if you are in pain from your wisdom tooth, get it out. Yes there are risks but there are also risks of leaving infection teeth in place.

As always, if I have terrified you and you wish to tell me this, or if you want any further explanation of any aspect, please feel free to comment on here, or follow me on twitter @smiles__better.


Ode to the boffins:

Forsberg Tooth size, spacing, and crowding in relation to eruption or impaction of third molars American Journal of Orthodontics and Dentofacial Orthopedics Volume 94, Issue 1, July 1988, Pages 57–62
Friedman The Prophylactic Extraction of Third Molars: A Public Health Hazard Am J Public Health. 2007 September; 97(9): 1554–1559.

Harradine NW, Pearson MH, Toth B. The effect of extraction of third molars on late lower incisor crowding: a randomized controlled trial. Br J Orthod. 1998 May;25(2):117-22.

Lindqvist, Extraction of third molars in cases of anticipated crowding in the lower jaw American Journal of Orthodontics Volume 81, Issue 2, February 1982, Pages 130–139

NICE guidelines: Guidance on the Extraction of Wisdom Teeth


Sidlauskas A, Trakiniene G. Effect of the lower third molars on the lower dental arch crowding. Stomatologija. 2006;8(3):80-4.

Szalma J The prognostic value of panoramic radiography of inferior alveolar nerve damage after mandibular third molar removal: retrospective study of 400 cases. Oral Surg Oral Med Oral Pathol Oral Radiol Endod. 2010 Feb;109(2):294-302. Epub 2009 Oct 20.

http://www.toothology.net/getmedia.asp?media_id=52